Here are some tips given by Godzilla Modelers!
Helpful painting tips from Bill Jones (an incredible Kaiju model painter)!!!
Michael Porter walks us through step-by-step, as he builds and paints Max Factory's Gamera 1995 Kit!
VINYL & RESIN KITS:
Tips by:
Bilal El-Amin, Jeff Horne jema@megsinet.net & Doc Mack Ghost@megsinet.net
1.) Check: When you get your kit, make sure all of the parts are there before you start trimming and gluing. If you are missing any try contacting the dealer you purchased it from. If that doesn't work, contact the manufacturer.
2) Wash: Wash all of the pieces in warm soapy water. This will remove any mold release, which may keep your paint from adhering properly.
3) Trim: For vinyl kits, you need to trim the excess flash off of the parts. This is usually done with a sharp x-acto knife. If you soften the vinyl (by immersing the part in hot tap water or by using a blow dryer), it will be much easier and safer. For plastic and resin kits, you need to trim off excess flash with sprew nippers or some type of flat edged wire cutters. You can trim off the mold lines with the dull edge of a hobby knife and/or sandpaper. New modelers shuold be VERY Careful..sometimes vinyl can be hard to cut in one spot and then very easy it others. Take it slow and pay attention.
4) Test fit: Now is a good time to test fit all of the parts. You want to make sure all the parts fit together as expected. You'll want to decide weather it is best to assemble and putty the whole kit and paint as a single unit or paint in sub assemblies. It all depends on the kit. Sometimes it's easier to paint in sub assemblies because it too hard to get to parts after the kit has been totally assembled. Also you may want to make decisions about re-posing the kit at this point.
5) Glue: For plastic kits, you can use the standard Testors plastic cement or this stuff called plastic weld, which works pretty good. Some folks use two-part epoxy cement. I generally use a hobby grade of super glue called Zap-A-Gap because I don't like to wait for plastic cement to set up. Use Zap-A-Gap for the Vinyl kits, too. It comes in different thinknesses that can be very helpful. I like to use the middle thickness (CA+?) because it doesn't run all over the model like the thin, but it gets in the cracks nicely. Don't forget to get ZipKicker accelerant. This will help with the curing/hardening of the glue. If you do use it, be sure to wipe off excess before applying glue to areas nearby because it will instantly harden the glue and go right up the tips. Which brings me to the tips. Get the extender tips. I think Zap makes them also. They fit right on the end of the glue bottle and allow for much more precise application of the glue.
6) Putty: I usually use two part epoxy putty (milliput*) to fill in any obvious holes, seams or other imperfections. You could also use polyester putty (squadron green) if you prefer. I like milliput because it gives me more working time and it smoothes with water. I have used the Squadron putty and a resin putty call SuperSculpt from a Taxidermy company. E-mail me directly and I'll get their phone number from home. It's cheaper than Milliput and very similar, according to a friend who's used both. I agree that the resin-based putty is better to work with and mold after applying. It takes about 24 hours to cure so you can shape it for quite some time. Be careful of finger prints in the soft putty when working with the model. Also get some good sculpting tools so you can work the putty to continue G's skin texture across the putty. I've been told that there's also a product that you can apply to skin elsewhere and after it cures and is removed, it can be used as a stamp to apply the exact skin texture. I've never used this and don't know the name. Besides, the tools do just fine for me. As a former newbie, the keys are 1) Go slow, 2) go light on the glue and 3) Keep super glue remover nearby. It should be near the Zap A Gap on the shelf at your hobby shop. This is a must. Even if you're careful, you'll get it on your hands at first. Just don't touch your lips. If you can't find the remover, use finger nail polish remover. The thing to remember about Super Glue is that it as invented to quickly seal wounds on the battlefield, so sticking to skin is what it does best.
7) Sand: For many of the Godzilla and monster kits, sanding is not usually required because of the rough textured hides of the subjects. Robots, people or any other figures or objects with smooth surfaces may need a little sanding particularly when trying to hide seems or holes.
8) Primer: It's very important to prime your kits with some type of primer. Primer helps point out any areas that you forgot to putty. It also helps fill in any small air bubbles that you sometimes get on the surface of vinyl and resin kits. It also helps blend the color of the putty with whatever the color the kit was molded in. The most important reason to prime however is it gives your paint a good surface to adhere to.
9) Painting: There are all types of paint and painting techniques. Water based paints seem to be the most popular. I generally use Tamyia, and PolyScale. You should be able to find one or both lines in most hobby stores or online. As far as technique, for Godzilla, you could get good results with using good quality paint brushes. As you progress you may want to invest in an airbrush. Use Acrylic Paint. NOT Enamel. Testors has come out with a line of Acrylics that are great for airbrushing. Since it's water based, clean up is easy with soap and a little warm water. Again, do not use enamel. Enamel has a chemical reaction with the vinyl and it doesn't dry. It remains tacky, and that you don't want. For colors. I like to use a black undercoat on G with a very light "dry-brush" coat of dark grey. I love the combination. Just don't use green!! ;-) Mainly, have fun. and remember, if you don't like the results, you can always repaint it.
10) Have fun!
MORE TIPS!
I’m working on a Kaiyodo Gamera ’95 vinyl kit. Vinyl kits are cast hollow and are somewhat lighter in weight than a comparably sized resin kit. I like to fill the feet of my vinyl kits with plaster to give them a little extra weight. It makes the kit feel more like a resin kit or statue and gives them more stability. The trick when filling a kit with plaster is to not over do it. In most cases, there’s no need to fill the whole kit. You are simply trying to weight down the lower half of the kit. In the case of my Gamera kit, I got some plaster from my local home center and mixed it with water to the thickness of pancake batter. I then poured the mixture into the lower leg sections, which were cast as separate pieces from the main body. Let this harden and dry over night. You don’t want to have trapped moisture in the kit as the plaster could crack and your kit will sound like a bank when your friends pick it up to admire your handy work. To further protect against the chance of the plaster cracking, I sealed off the top of the plaster with a little 5-minute epoxy glue. This is only one method for filling a kit. I’ve heard other folks use be-be’s, lead, sand, foam, or even resin. Whatever works for you.
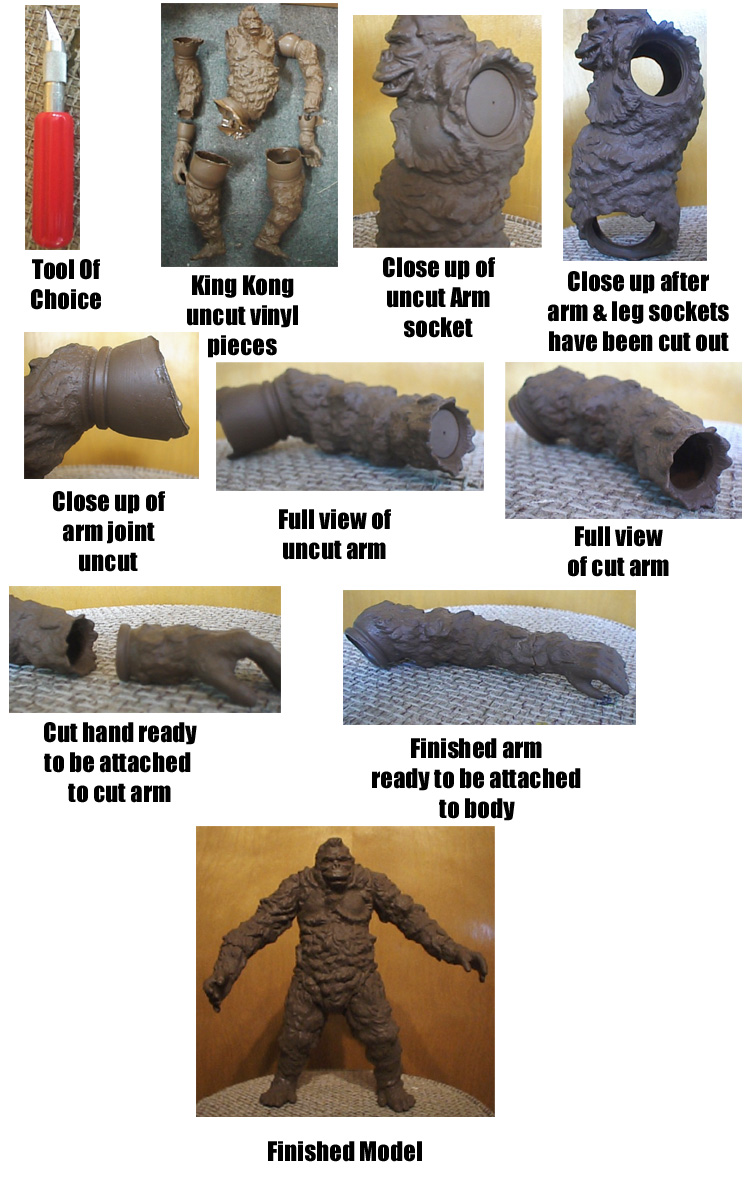
Here is what a UNBUILT kit will look like! And a quick walk through on the assembly! Shown is the Billiken King Kong!